If you appreciate this guide, we accept Donations.
In the previous Getting Started page, we performed a check on the PlayStation 2 to determine which version of the DVD Player firmware we have on our PlayStation 2 unit. If you skipped over this part, please return to the getting started page, and make note of your DVD Player firmware version.
Once you have determined the version of your PlayStation 2’s DVD Player firmware, you can proceed to download your required version of Free DVD Boot from the next section.
What you will need for this part of the guide:
- A Sony Playstation 2 (Phat or Slim model) (eBay / Amazon) with at least one Dual Shock controller, one A/C Power adapter and one Composite or Component video out cable. PDXModshop does not actively sell full consoles in our shop, so be careful to read what you are buying elsewhere to be sure that it is not just the console and no other accessories.
- A PC or laptop with a DVD Burner.
- One DVD+R or DVD-R blank media disc.
- At least one genuine MagicGate PS2 Memory Card or Generic PS2 Memory Card.
- One USB Thumb Drive, at least 2GB in size.
section i – download freedvdboot

In this next step, you will need to download a pre-built FreeDVDBoot image file to burn to a blank DVD disc. MATCH your DVD Player Version with the image you download. Please select from the options below (expandable menus):
Version 2.10 – 2.12
DVD Player Versions 2.10 – 2.12 are typically found on Playstation 2 Phat models, if you have confirmed that you have version 2.10 – 2.12, you should download this version of FreeDVDBoot.
Some mirrors are provided in ZIP format and will require decompression by Windows, WinZip, WinRAR or 7Zip.
Version 3.04
DVD Player Version 3.04 is the odd one out. This version can be found on both late model Playstation 2 Phat systems and some Slim models. if you have confirmed that you have version 3.04, you should download this version of FreeDVDBoot.
Some mirrors are provided in ZIP format and will require decompression by Windows, WinZip, WinRAR or 7Zip.
3.10 – 3.11
DVD Player Version 3.10-3.11 is the version rolled out on most Slim model Playstation 2’s. if you have confirmed that you have version 3.10 or 3.11, you should download this version of FreeDVDBoot.
Some mirrors are provided in ZIP format and will require decompression by Windows, WinZip, WinRAR or 7Zip.
PLEASE NOTE: FreeDVDBoot is still in its early stages. As such, it is not guaranteed to work on all Playstation 2 units. If you’re DVD Version is not present above, or the disc fails to boot on your PS2, you may need to use the 007: Agent Under Fire method.
section ii – burn matching iso to dvd+r
Once you have downloaded the ISO that matches your DVD Player Version in the PS2’s Version Information screen, you will need to burn the image to a blank DVD disc. PDXModshop recommends the use of ImgBurn to do this.
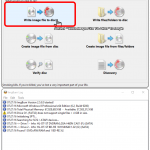
1.) Start by opening ImgBurn and selecting Write image file to disc from the EZ-Pick Wizard.

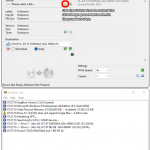
2.) Once you have selected Write image file to disc you will see a screen (pictured below), which will have all write information prepared. Right now, all information is blank, until an image is selected. The left column of the program presents details about the image, the right column information about the disc inserted into the burner; and the bottom window presents information about the system and burner device status. To the upper right of the left-hand image column is a folder icon with a magnifying glass (image selection). Click this button to bring up an image selection window.

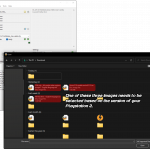
3.) From the Open dialogue that appears (pictured below), select the image that corresponds with your PS2 DVD Version that you downloaded in the step above. Then click “Open” at the bottom right of the window. The image information will populate in the left column to verify successful loading of the image.

image file you want to burn to a disc (click to enlarge)
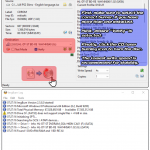
4.) Once you have inserted a blank DVD into the drive, the right column should populate with information regarding the blank media in the drive and its supported write speeds (pictured below), etc etc. If no information appears, or the status says COMPLETE instead of EMPTY the disc may have already been written to, if no information appears at all, then make sure that the correct burner (Destination) drive is selected, in the event that you have more than one burner.

and tick the verify option (click to enlarge)
Ensuring the correct image is selected, confirm your correct burner is selected, tick the VERIFY option, and choose the LOWEST burn speed possible. Then select the icon near the bottom left with the page pointing to a disc with a laser (burn image button), click this button to begin burning the disc.
Once ImgBurn reports a sucessful burn, you are ready to move on to the next step.
Table of Contents
- Section I – Download FreeDVDBoot
- Section II – Burn Matching ISO to DVD+R
- Section III – Test FreeDVDBoot
- Section IV – Prepare FMCB Files
- Section V – Install FMCB